How To Carve A Turkey - Your Guide To Perfect Portions
The holiday bird, a centerpiece for so many gatherings, can sometimes feel a bit imposing when it comes time to separate it into serving pieces. Yet, with a few simple pointers and a little preparation, you can approach this task with a quiet confidence. Imagine presenting your loved ones with beautifully cut slices, all ready for their plates. It truly makes the meal feel even more special, you know?
You've spent hours, perhaps even days, getting that big bird just right, from seasoning to roasting until it's a lovely golden brown. Now, the moment arrives when it needs to be transformed from a whole, impressive creature into individual servings. This part, actually, doesn't have to be a source of stress or guesswork. It's really more about knowing a few basic moves and having the right items close by.
This straightforward approach will walk you through the process, helping you turn that impressive roasted fowl into easily manageable portions of both light and dark meat. You'll pick up some handy suggestions for letting the bird settle after cooking, for using a proper cutting instrument, and for keeping the meat pleasantly warm for everyone at the table. We’ll cover the basic tools you’ll want to have on hand and, so, how to get those tasty pieces ready for enjoyment.
- Best Morning Pic
- Cast Of Interior Chinatown Television Show
- Anne Hathaway Catwoman
- Frank Sheeran
- Corte De Pelo Para Ni%C3%B1os
Table of Contents
- What You'll Need to Carve a Turkey
- Why Resting Your Turkey Matters for a Good Carve
- How Do You Start to Carve a Turkey?
- Separating the Legs - A Key Step in How to Carve a Turkey
- Getting the Wings Just Right - Tips for How to Carve a Turkey
- What's the Best Way to Get the Breast Meat When You Carve a Turkey?
- Slicing the Breast Meat - The Art of How to Carve a Turkey
- How Do You Keep Your Carved Turkey Warm and Ready to Serve?
- Storing Leftovers - Practical Advice After You Carve a Turkey
- Any Other Helpful Hints for How to Carve a Turkey?
What You'll Need to Carve a Turkey
Before you even think about making the first cut, it's pretty important to gather your supplies. Having everything within easy reach makes the whole experience much smoother and, honestly, less messy. You're going to want a good, sturdy surface for working, something that won't slip around. A large cutting board is really perfect for this, perhaps one with a little groove around the edge to catch any juices that might escape. This keeps your counter cleaner and helps keep all that lovely flavor in one place, you know?
Then, there are the tools for the actual cutting. A very sharp knife is, perhaps, the single most important item. When we say sharp, we mean it should glide through the meat with minimal effort, not saw at it. A dull knife is not only frustrating but can also be a bit more dangerous because you have to apply more pressure, which can cause slips. A long, thin slicing knife, or even a good chef's knife, works well here. You might also find kitchen shears to be quite useful, especially for separating some of the tougher joints or for getting at those little bits that are hard to reach with a knife. They really are quite handy for certain parts of the bird.
A meat fork, the kind with two long tines, is also a good idea. This helps you steady the bird as you're working, keeping it from moving around while you make your cuts. It also means you're not using your hands as much to hold the hot meat, which is a definite plus. And for that final touch, some fresh herbs can be a nice addition for decorating the platter, making your presentation look extra inviting. So, just gather these few things, and you'll be set up for success, pretty much.
- Doxin Breeders
- Sharper Image
- %D8%B1%D8%AD%D9%8A%D9%84 %D8%B2%D9%88%D8%AC%D8%A9 %D9%8A%D8%B9%D9%82%D9%88%D8%A8
- Wallace Shawn Movies And Tv Shows
- Burpee Seeds
Why Resting Your Turkey Matters for a Good Carve
Once your turkey comes out of the oven, it's very tempting to start cutting into it right away. The aroma fills the air, and everyone is likely quite hungry. But, and this is a big "but," giving the bird some time to relax after cooking is, honestly, one of the most important steps for a successful carve and, more importantly, for juicy, delicious meat. Think of it this way: when the turkey is cooking, the muscle fibers contract, holding onto all that moisture pretty tightly. If you cut into it immediately, all those flavorful juices will just run out onto your cutting board, leaving you with dry meat.
Allowing the turkey to rest, usually for about 20 to 30 minutes for a standard-sized bird, lets those muscle fibers loosen up and reabsorb the juices. This means that when you do slice, the moisture stays within the meat, making every bite tender and full of flavor. You can simply cover the turkey loosely with a piece of aluminum foil to keep it warm during this resting period. This also gives you a little window of time to get your carving station ready, sharpen your knife, and maybe even pour yourself a drink. It's a small pause that makes a really big difference in the quality of your finished product, you know?
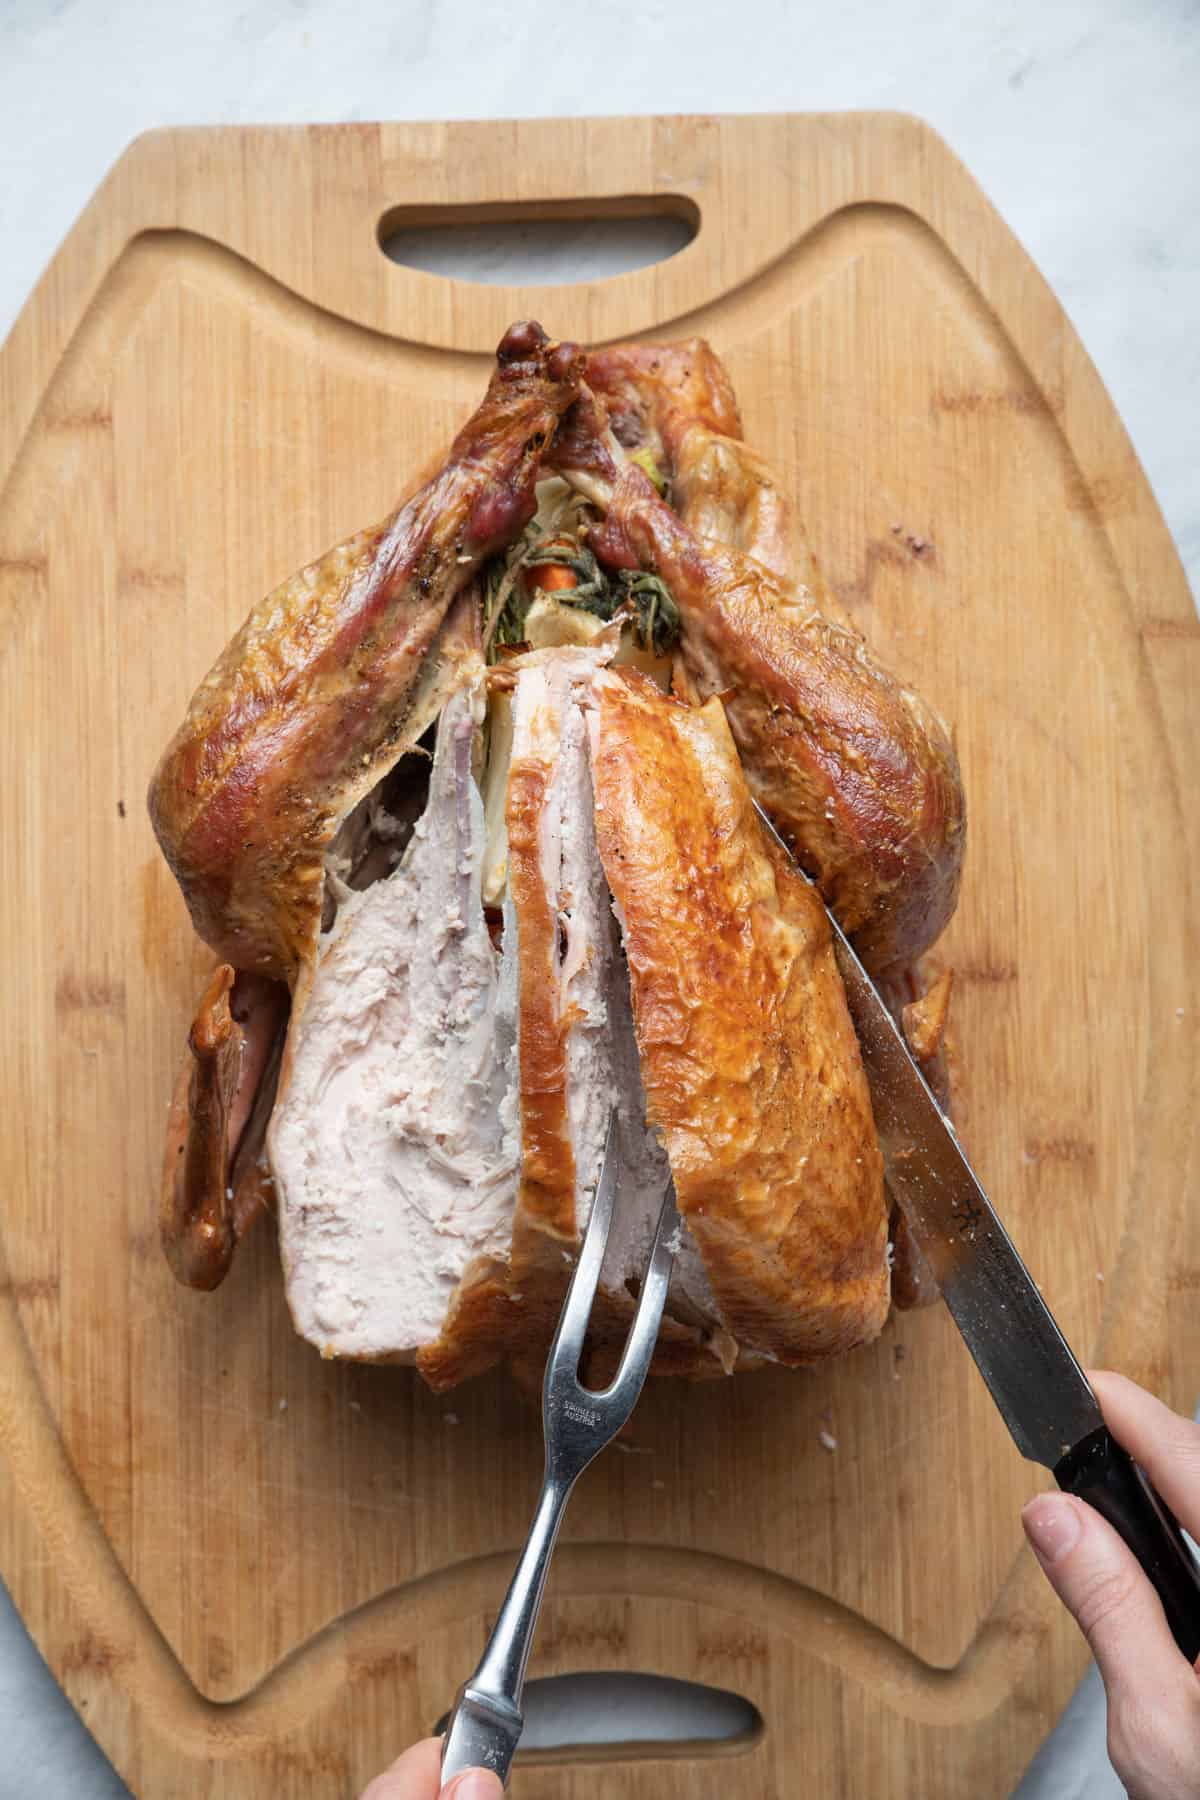
How Do You Start to Carve a Turkey?
With your turkey rested and your tools ready, it's time to begin. The very first step is to place the bird on your cutting board, breast side up. You'll want to make sure it's stable and not rocking around. A meat fork can help you keep it steady. The idea is to work methodically, separating the major parts of the bird before you start slicing the meat into individual portions. This makes the whole process much more manageable and, frankly, less intimidating. You're basically breaking down the bird into its natural sections, which makes it easier to handle, pretty much.
You'll begin by addressing the legs and wings, as these are the easiest to remove and give you more room to work on the larger breast section. Remember, the goal here is to make clean, efficient cuts, so a steady hand and a well-prepared knife are your best friends. Don't feel rushed; take your time with each step. It’s not a race, after all. You want to get nice pieces for everyone, and rushing can make that a bit harder. So, just take a breath and start with confidence.
Separating the Legs - A Key Step in How to Carve a Turkey
To get the legs off, locate where the thigh connects to the body. There's a joint there that you're aiming for. You can usually pull the leg slightly away from the body to make this joint more visible. Take your sharp knife and make a cut through the skin and meat between the leg and the body, going down until you feel the bone. You'll want to push the leg down and away from the body, and you should feel the joint pop or separate. Sometimes, a little bit of twisting helps to dislocate it, too.
Once the joint is separated, you can simply cut through any remaining skin or connective tissue to fully remove the leg. Repeat this for the other leg. Now you have two whole leg-thigh pieces. If you want to separate the drumstick from the thigh, find the joint where they connect. You can bend the leg to find the natural break point. Cut through this joint with your knife. This gives you distinct drumsticks and thigh pieces, which some people prefer to serve separately. It’s really quite straightforward once you get the hang of it, you know?
Getting the Wings Just Right - Tips for How to Carve a Turkey
Next up are the wings. These are generally simpler to remove than the legs. Just like with the legs, you're looking for the joint where the wing attaches to the breast. Pull the wing away from the body a little to expose the joint. Use your sharp knife to cut through the skin and meat around the joint. If you hit bone, adjust your angle slightly until you find the soft spot where the joint connects. A quick cut through the joint should release the wing easily.
Repeat this for the second wing. Some people like to serve the wings whole, while others might separate them into drumettes and flats, or even just discard the very tip. It really depends on your preference and how your guests like to eat them. The wing tips, for example, are actually quite good for making stock later on, so don't just toss them out without thinking. They add a lot of flavor to broths, as a matter of fact.
What's the Best Way to Get the Breast Meat When You Carve a Turkey?
With the legs and wings removed, you now have a much clearer view of the breast section. This is often the part that people find most challenging, but it doesn't have to be. The key here is to follow the natural lines of the bird's bone structure. You're aiming to remove the breast meat in large, intact pieces, which then makes slicing much simpler. It’s pretty much like filleting a fish, in a way, but with a turkey instead.
Start by locating the breastbone, which runs right down the center of the bird. Place your knife along one side of the breastbone, making a cut straight down until you feel the rib cage. Then, keeping your knife angled slightly, follow the contour of the rib cage, gradually separating the breast meat from the bone. Use long, smooth strokes, keeping the knife as close to the bone as possible to get as much meat as you can. This might take a few passes, but just keep following that bone. You'll feel the meat pulling away as you go. You'll eventually reach the wishbone area near the front, and then the shoulder joint at the back. Cut through any remaining attachments, and the entire breast half should lift off in one piece. Repeat this process for the other side of the breast. You’ll be left with two large, beautiful sections of white meat, ready for the next step, which is slicing.
Slicing the Breast Meat - The Art of How to Carve a Turkey
Once you have the breast meat separated from the carcass, you can place each piece on your cutting board, skin side up. For neat, even slices, you’ll want to cut against the grain of the meat. This means slicing across the muscle fibers, which helps to make the meat more tender to chew. If you slice with the grain, the pieces can be a bit chewier. So, look at the direction the meat fibers are running and make your cuts perpendicular to them.
Use your sharp knife to make even slices, about a quarter to a half-inch thick, depending on how thick you or your guests prefer them. Some people like very thin, delicate slices, while others prefer something a little more substantial. Keep the slices uniform for a nice presentation on the platter. As you slice, you can arrange the pieces on a warm serving dish. This is where those fresh herbs come in handy for a bit of visual appeal. It really does make the whole thing look quite inviting, doesn't it?
How Do You Keep Your Carved Turkey Warm and Ready to Serve?
After all that effort, the last thing you want is for your perfectly carved turkey to get cold before it reaches the table. Keeping the meat warm is, honestly, pretty simple. As you slice the meat, you can transfer it directly to a warm serving platter. You can warm your platter by placing it in a low oven for a few minutes before you start carving, or by rinsing it with hot water. Just be sure to dry it completely before putting the meat on it.
Once the meat is on the warm platter, you can loosely cover it with aluminum foil. This helps to trap the heat and keep the slices at a pleasant temperature until everyone is ready to eat. Some people also like to add a little bit of the turkey's warm pan juices over the carved meat before covering it; this can add even more flavor and moisture. So, by doing just these few things, you ensure that every piece of that delicious bird is enjoyed just as it should be: warm and juicy.
Storing Leftovers - Practical Advice After You Carve a Turkey
One of the best parts about a turkey dinner is, arguably, the leftovers. There's so much you can do with them, from sandwiches to soups. To make sure your leftover turkey stays good for as long as possible, proper storage is key. Once the meal is over and the meat has cooled down a bit, you'll want to get it into the refrigerator fairly quickly. Don't leave it out at room temperature for too long, as that can encourage unwanted things to grow.
Place the carved meat in airtight containers. You can separate the dark and white meat if you like, or keep them together. Make sure the containers are sealed well to keep air out, which helps prevent the meat from drying out and keeps it fresh. Leftover turkey typically keeps well in the refrigerator for about three to four days. If you have a lot of leftovers, or if you want to save some for later, you can also freeze the carved meat. It freezes quite well for a longer period, usually for a few months. Just wrap it tightly in plastic wrap or foil before placing it in a freezer-safe bag or container. This way, you can enjoy that wonderful turkey flavor for days, or even weeks, to come, you know?
Any Other Helpful Hints for How to Carve a Turkey?
Beyond the basic steps, there are a few other little things that can make your turkey carving experience even better. For instance, always make sure your cutting board is stable. If it tends to slide around on your counter, you can place a damp cloth or a non-slip mat underneath it. This prevents it from shifting while you're working with a sharp knife, which is actually a pretty important safety measure.
Also, don't forget about the turkey carcass itself. While the meat is the star of the show, the bones and any remaining bits of meat are really valuable for making a flavorful turkey stock. You can simmer them with some vegetables like carrots, celery, and onions, along with some herbs, to create a wonderful base for soups or gravies. It's a great way to use up every part of the bird and get even more enjoyment from your efforts. So, think of it as a bonus meal in the making, pretty much.
Finally, remember that practice makes perfect. The first time you carve a turkey might feel a little awkward, but with each holiday or special meal, you'll get more comfortable and efficient. You might even find your own little tricks that work best for you. The most important thing is to enjoy the process and the delicious results. You're providing a wonderful meal for your family and friends, and that's what truly matters. Just have fun with it, you know?
This guide has shown you how to separate a turkey into its light and dark meat portions, offering suggestions on letting the bird settle, using a well-honed cutting tool, and serving the meat warm. You've learned about the necessary items like a cutting board, kitchen shears, and a sharp knife, along with fresh herbs for display. We walked through the straightforward actions to take off the legs, the breast, the wings, and the drumsticks, then how to cut the meat into pieces ready for serving. You also found out about the most effective items, suggestions, and methods for cutting the meat and keeping any extra portions.
:max_bytes(150000):strip_icc()/how-carve-pumpkin-etch-d105470-1010-03f57c5c50ef45c9a7d54e0304dc9d5f.jpg)
Carve
Carve
How do I Learn to Carve Wood? | Woodcarving Course | School of Wood Carving
