Baking French Bread- Your Guide To Homemade Loaves
There's something truly special, a kind of warmth that just fills your kitchen, when you pull a fresh loaf of bread from the oven. It's that wonderful smell, you know, the one that makes everyone gather around, ready to tear off a piece. Making French bread at home might seem like a big deal, but honestly, it's quite simple to do. You can get that hot, right-from-the-oven goodness without too much fuss at all, and it's a very rewarding feeling, too it's almost like magic, seeing dough turn into something so delicious.
Picture this- a loaf that's wonderfully light, almost airy, inside, yet has a crust that crackles just so when you break into it. The middle part, that's the soft, satisfyingly chewy bit, perfect for soaking up a little soup or just enjoying plain. This kind of homemade French bread, the sort that tastes like it came from a fancy bakery, is well within your reach, and we're going to walk through how to get there. It really doesn't take much, just a few basic things and a bit of your time, and you'll have something quite remarkable.
Whether you prefer to get your hands right into the dough, feeling every bit of it as you work, or you'd rather let a kitchen helper do some of the heavy lifting, this guide covers both ways to create these lovely loaves. We'll talk about how to shape them just right, how to make those pretty little cuts on top, and how to encourage that truly crisp outside. It's all about a few straightforward actions that lead to a wonderfully satisfying result, and you'll find it's more straightforward than you might think, really.
- Flying Fox Bat
- Alaska House Votes To Urge Trump To Keep Denali Name
- Richland One
- Pull Up Bar
- San Diego Craigslist
Table of Contents
- Getting Started- What Do You Need for French Bread?
- The First Step- Waking Up the Yeast for Your French Bread
- Mixing It All Together- Making the French Bread Dough
- Shaping Your French Bread- What Kind of Loaf Will You Make?
- Getting That Bakery Crust on Your French Bread
- The Final Rise for Your French Bread
- Baking Your French Bread to Perfection
- Making Your French Bread Your Own
Getting Started- What Do You Need for French Bread?
When you're thinking about putting together some delightful French bread at home, you might be surprised by how few items you actually need. It's quite a simple list, really, and most of these things are probably already sitting in your kitchen pantry. You'll definitely want some yeast, which is what gives the bread its lovely lift and airy feel. Then there's water, just plain water, which helps bring everything together. A bit of salt is pretty important, too, as it helps bring out the good flavors and helps control the yeast's actions. Of course, you'll need flour, the main building block for your loaf. Some recipes might also call for an egg, which can add a little richness and help with the color of the crust. That's more or less it for the basic components, which is pretty neat, isn't it?
Beyond the ingredients themselves, you'll also need a place to bake your delicious creation. This could be a simple pan or a baking sheet, depending on the sort of shape you're aiming for. It's all very straightforward, really, just these few items, and you're well on your way to a warm, homemade treat. It's kind of amazing how something so delicious can come from such a basic collection of things, you know? This simplicity is, in some respects, part of the charm of making bread at home.
The First Step- Waking Up the Yeast for Your French Bread
Before you get to mixing everything up, there's a little preliminary action you'll want to take with your yeast. This is what we call "proofing" it, and it's basically like giving your yeast a gentle nudge to wake it up and make sure it's ready to do its job. You'll take a small bowl or a glass measuring cup, and in it, you'll put some warm water. This water shouldn't be too hot, just comfortably warm, like a pleasant bath. Then, you'll add your yeast to this water, along with a little bit of sugar. The sugar acts as a sort of breakfast for the yeast, giving it something to munch on and get going. You just let this mixture sit for a few minutes, maybe five to eight minutes or so. What you're looking for is for it to start getting foamy on top. That foam is a good sign, it means your yeast is active and alive, ready to help your French bread rise beautifully. If it doesn't foam, well, you might need to try with some new yeast, but usually, it works just fine, you know?
Mixing It All Together- Making the French Bread Dough
Once your yeast is all bubbly and ready, the next step is to bring all your components into one single mass of dough. You'll take that foamy water and yeast mixture and add it to your flour. Some people like to do this by hand, getting right in there with their fingers, feeling the textures change as everything combines. Others might prefer to use a stand mixer, which can really do the hard work of kneading for you. Either way, you'll mix until all the bits come together, forming a coherent lump of dough. It might seem a little sticky at first, but with a bit more mixing or kneading, it starts to smooth out and become more manageable. If you're using a mixer, you might need to add the rest of the flour little by little, perhaps half a cup at a time, until the dough forms a nice ball. Then, you just increase the speed a bit, letting the mixer work it for a couple of minutes, maybe two or three, until it's all come together properly. It's pretty satisfying, actually, to see it transform like that.
Shaping Your French Bread- What Kind of Loaf Will You Make?
Now, this is where your French bread really starts to take on its familiar form. After your dough has gone through its initial processing, you'll want to transfer it to a surface that's been dusted with a little flour. A large cutting board works really well for this, as a matter of fact. The way you divide and shape your dough depends on the sort of loaf you're hoping to create. If you're aiming for those long, slender baguettes, you'd typically divide your dough into about seven pieces, each weighing around 247 grams. This gives you those classic, skinny shapes. But if you're leaning more towards round, freestanding loaves, often called boules, or even the more standard 9x5 inch loaves, then you'd usually split your dough into three larger pieces, with each one weighing roughly 578 grams. It's pretty flexible, you know, depending on what you're in the mood for.
When it comes to the actual shaping, a common approach for many types of French bread involves splitting the main dough into two portions that resemble rectangles. Then, you gently roll each of these portions up into a sort of sphere or a log, depending on your final goal. You'll turn the dough onto a floured area, making sure it doesn't stick. Then, you place it into a bowl that's been greased a little, turning the dough over once so that the top also gets a thin coating of grease. This helps prevent a dry skin from forming. After that, you cover the bowl and let the dough rest in a warm spot. This resting period is pretty important, as it allows the dough to get bigger, usually doubling in size, which takes about an hour. It's kind of like letting it take a little nap before its big moment in the oven, you know?
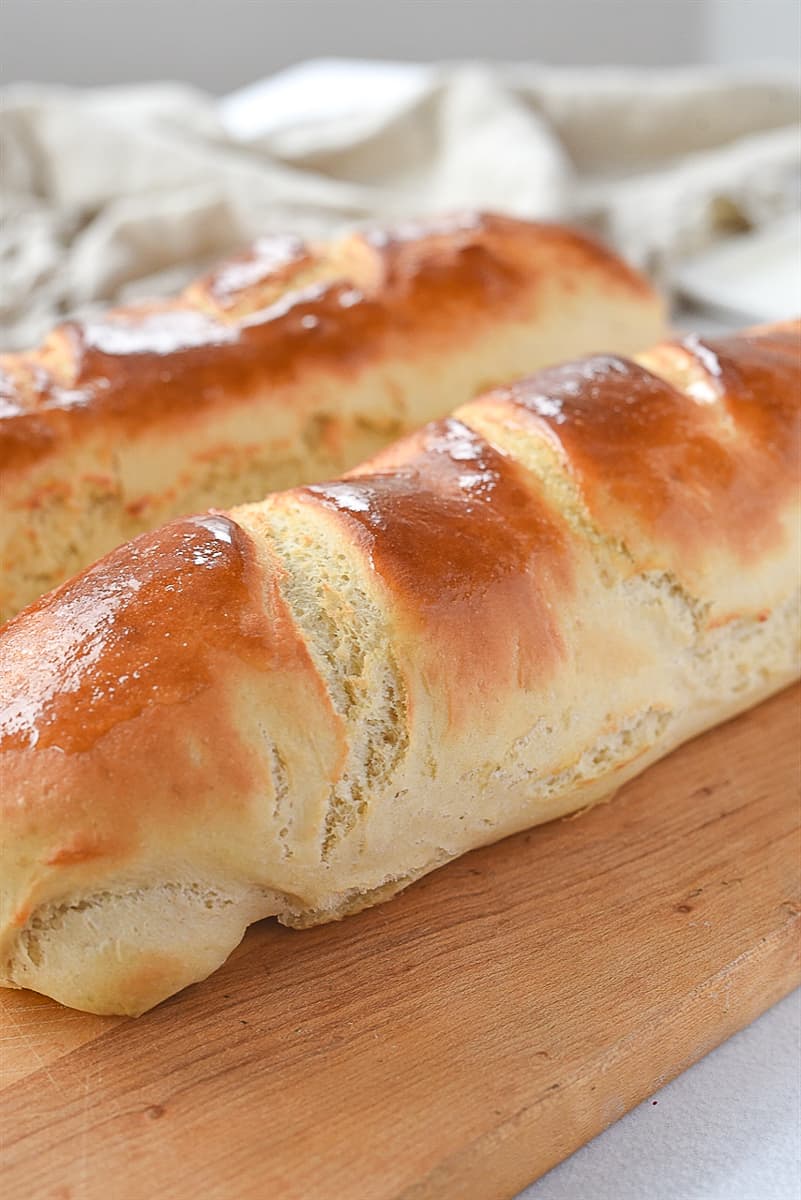
Getting That Bakery Crust on Your French Bread
One of the most appealing things about French bread is that wonderfully crisp, almost crackly crust. To get that at home, you're going to need to do a little bit of trickery to make your regular kitchen oven act more like a professional baker's oven. It's all about creating a steamy environment, which helps the crust develop its signature crunch. The first thing you'll want to do is put a baking pizza stone right on the middle rack of your oven. This stone gets really hot and helps to give your loaf a good, even heat from below. Then, on the rack at the very bottom of the oven, you'll place a metal broiler pan. It's important that this pan is at least four inches below your baking stone, so there's enough space. This setup is pretty simple, but it makes a significant difference, honestly.
The trick with the broiler pan is that you'll add water to it when you put your bread in to bake. This water turns into steam, which is the secret to that lovely, shiny, and super crunchy crust. The steam keeps the outside of the bread soft for a little while longer during the initial baking, allowing the dough to expand fully before the crust hardens. This means you get a bigger, airier loaf with that perfect outer shell. It's a rather clever way to mimic what big, fancy ovens do, and it really makes your homemade French bread feel special. It's something that, you know, really elevates the whole experience.
The Final Rise for Your French Bread
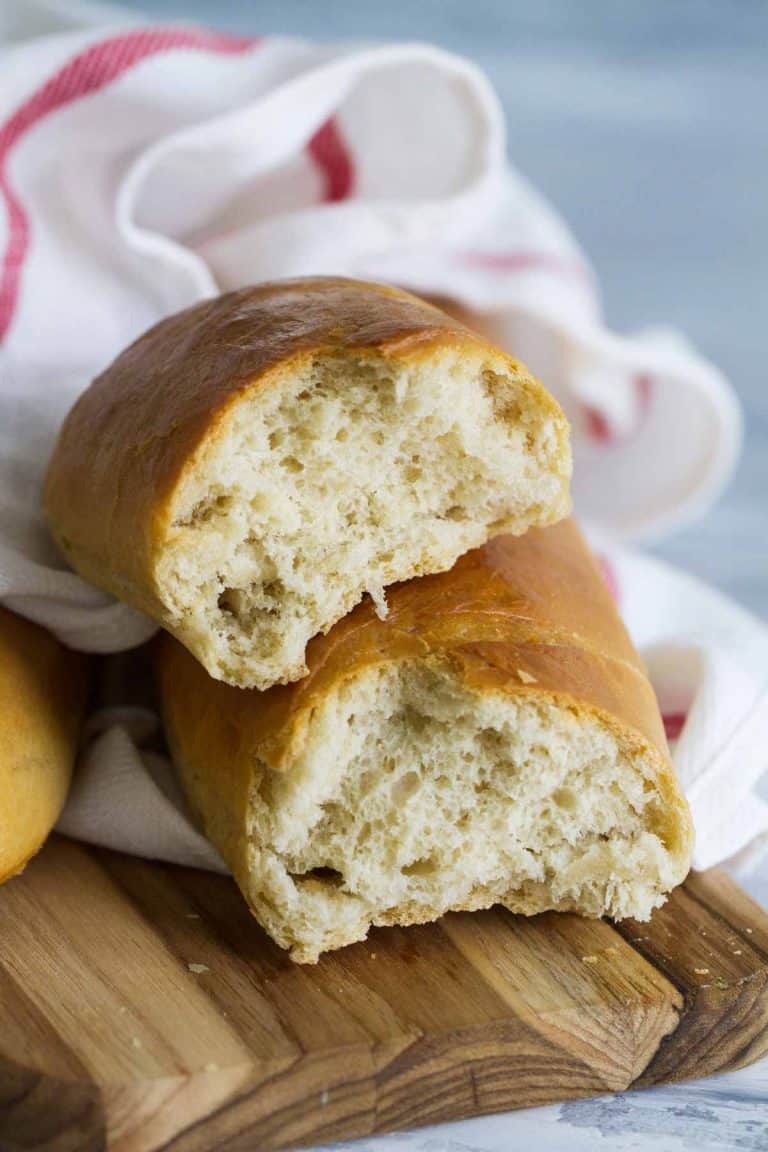
After you've shaped your French bread loaves, there's one more important resting period before they go into the heat. This is often called the "final rise," and it's where the dough gets its last big puff before baking. You'll want to place your shaped loaves in a warm place, perhaps on a baking sheet, and let them sit. During this time, the yeast is still working, creating more little pockets of air within the dough, which contributes to that light and airy texture we all love in French bread. You'll notice the loaves getting visibly larger, almost doubling in their bulk. This usually takes about an hour, but it can vary a bit depending on how warm your room is. It's pretty cool to watch them expand, you know, getting ready for their transformation. This step is pretty important for getting that soft, chewy center that makes French bread so appealing.
Baking Your French Bread to Perfection
When your French bread loaves have completed their final rise and are looking plump and ready, it's time for them to meet the heat. Remember that pizza stone and broiler pan setup we talked about? That's going to be key here. You'll carefully place your loaves onto the hot baking stone. At the same time, you'll pour some water into that hot broiler pan at the bottom of the oven. This creates a burst of steam, which is absolutely vital for getting that professional-looking, crusty outside. The steam helps the crust stay pliable for a few minutes, allowing the bread to expand fully before it sets. This means you get a really good rise and a thin, crisp shell. It's a rather simple trick that yields very good results, honestly.
As the loaves bake, you'll notice them turning a beautiful golden color, and your kitchen will start to smell absolutely wonderful. This whole process, from beginning to end, can actually be done in about two hours, which is pretty quick for homemade bread, if you think about it. You're aiming for a loaf that's soft inside, with that perfect chew, and a crust that's not just crisp but also has a lovely golden hue. The steam helps with that too, making the surface shiny and appealing. It’s quite satisfying, really, to pull out a couple of these gorgeous, warm loaves, knowing you made them yourself. It's a very rewarding experience, in a way.
Making Your French Bread Your Own
While classic French bread is amazing just as it is, there's plenty of room to put your own spin on it and make it even more exciting. If you're feeling a little adventurous, you could try adding some extra flavors to your dough. For instance, putting in some minced garlic can give your loaf a wonderfully savory kick, making it perfect for serving with pasta or a hearty soup. Fresh herbs, like rosemary or thyme, also work really well, adding a fragrant, earthy note that's quite delightful. You just mix them into the dough when you're doing the main combining step. Or, if you're a fan of something a bit richer, shredded cheese, like cheddar or Parmesan, can be folded into the dough. This creates a kind of cheesy French bread that's absolutely delicious, especially when it's still warm from the oven. It's pretty fun to experiment, you know, seeing what new tastes you can create with a basic recipe.
Making homemade French bread is, as a matter of fact, quite straightforward once you get the hang of the few simple actions involved. It’s a very versatile baked good that can be enjoyed in so many ways. The base recipe is simple and flexible, allowing for these sorts of additions. So, if you're looking for ways to spice up your regular bread routine, adding these little extras can make a big difference and really impress anyone you share it with. It's a bit like giving your bread a little personality, honestly.
- Iowa State Fair
- %D0%BA%D0%BE%D0%B8 %D1%88%D0%B0%D1%80%D0%B0%D0%BD
- Doxin Breeders
- Michael Cera And
- When Is Memorial Day 2025